Tuesday, December 29, 2015

C64 SID shootout part 3.

Page has been updated with a nice music player, shouldn't any playback issue appear anymore \o/

. .. ... .... ....... .... ... .. .


We used a music composed on 6581 SID for the previous test, so today we're gonna break the SID 6581 with a 8580 track. But first, let's start with a music that sounds kinda okayish on all SID.

Stellan 'Dane' Andersson - Break the Cycle. Played on a 8580 R5 first - as this supposed to be the SID revision the music was made on - then with 6581 revisions:

Clip 01. Dane - Break the Cycle - 8580 R5


It's a beautiful music, isn't it? Great instruments, nice melodies, a perfect track.


Clip 02. Dane - Break the Cycle - 6581 R2


Well, it obviously sounds different, especially the filter on the bass. Still, it's quite enjoyable.


Clip 03. Dane - Break the Cycle - 6581 R3


Thaaaaat background noise... 6581 R3 is definitely the worst SID version...


Clip 04. Dane - Break the Cycle - 6581 R4


Okayish, okayish, but...


Clip 05. Dane - Break the Cycle - 6581 R4AR


Better than R3 and R4 but not as good as R2 in my opinion.


. .. ... .... ....... .... ... .. .


Let's go deeper and listen to another track, Jammer - Mr. Marvellous, composed on 8580 and broken on 6581.

Clip 01. Jammer - Mr. Marvellous - 8580 R5


Great, great track, awesome instruments and speech-a-like sounds. Jammer did a very good job with designing these sounds and pushing the SID into its limits.


Clip 02. Jammer - Mr. Marvellous - 6581 R2


Whoah... this is... like a completely different music. Poor 6581... Some instruments sound completely broken.


Clip 03. Jammer - Mr. Marvellous - 6581 R3


:( :( :( the intro is completely broken :( :( :( the instruments and melodies are broken :( :( :( and the background noise is ugly :( :( :(


Clip 04. Jammer - Mr. Marvellous - 6581 R4


Same as the previous but at least the bass in the middle part is beefy.


Clip 05. Jammer - Mr. Marvellous - 6581 R4AR


I can hear the intro part! At least a bit. The bass is nice, overall it sounds better than the other 6581's but it has nothing to do with the original 8580 version.


. .. ... .... ....... .... ... .. .


Simon says let's go even deeper and break the cycle, I mean break the 6581! Jammer has some more awesome 8580 tracks, I'm curious how Club Style would sound.

Clip 01. Jammer - Club Style - 8580 R5


I just can't believe it how the SID is capable of doing these kind of sounds! Really awesome sound design, well done Jammer. The sidechain effect, the filter cutoff changes, the echoing lead. Just wow.


Clip 02. Jammer - Club Style - 6581 R2


Sounds like a completely different music. It's not a wonder, it's the difference between SID revisions. Jump to the next SID.


Clip 03. Jammer - Club Style - 6581 R3


I shall write something about this version but have no words to describe what I hear. Oh, did I mention the background noise of the R3?


Clip 04. Jammer - Club Style - 6581 R4


At least some of the instruments sound unique but the sidechain effect is still broken.


Clip 05. Jammer - Club Style - 6581 R4AR


Surprisingly, this version starts nice, keeps the okayish sounds and goes broken in the middle part. The distorted instruments at 2:00 sound kinda cool.


. .. ... .... ....... .... ... .. .


It's time to go mad - if you are still reading and listening. The following tracks is by Jammer as well, called Club Stylier (no, it's not the same as the previous one). Have a listen to the original 8580 version then to the 6581's without further comments. Thank you for reading this looong long post, I hope you enjoyed it.
See you next time.


Clip 01. Jammer - Club Stylier - 8580 R5


Clip 02. Jammer - Club Stylier - 6581 R2


Clip 03. Jammer - Club Stylier - 6581 R3


Clip 04. Jammer - Club Stylier - 6581 R4


Clip 05. Jammer - Club Stylier - 6581 R4AR


Monday, December 28, 2015

C64 SID shootout part 2.

Page has been updated with a nice music player, shouldn't any playback issue appear anymore \o/

. .. ... .... ....... .... ... .. .


Thank you for all the feedback! Looks like the previous post is a big success so I decided to add some more info and details about the shootout.

The recording chain was 3 C64, connected one-by-one to the input of a RME Babyface soundcard with RCA cable. Recorded with default loudness settings, all input faders were on 0dB. Obviously, there's not much to set on the C64, so the signal simply flew to the input of the soundcard.

Recording software was Adobe Audition 3.0.1 (the best Audition version of all :) ).

In case you were wondering, yes, all of the recordings are clipping a bit - this means the signals from the C64 were too hot but not _that_ much. I wanted to keep the original signal so I didn't limit/compress/lower the volume.

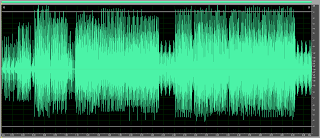
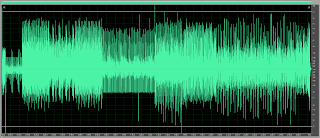
Loudness level is different for each SID, the recorded waveforms are also quite different:


I edited the recordings and chopped them to smaller parts to show the significant differences between the SID revisions. Play the audio previews and listen closely. Each preview plays the same part/melody and I switch between SIDs at even beats.

The order is obviously R2-R3-R4-R4AR-R5 :)

Clip 01:


The second and third part (R3 and R4) sound like the SID is pushed to its limit and it's hard to generate the flute-a-like sound.


Clip 02:


Here, the most significant difference is the snare drum instrument. It sounds quite different in each version.


Clip 03:


Different filtering on the bass. The most remarkable is the last one, which is the 8580 R5 version. The sound is more opened (higher filter cutoff and wider LFO) so the *wow*wow*wow* sounds different a lot.


Clip 04:


Again, the modulation on the filtered bass sounds different. Very. Different. Also, did you notice the loud background noise during the second section? That's the noise of the R3 SID.


Side-note #1:
I'm not 100% sure about the SID revisions I have. According to http://sid.kubarth.com/ my 6581 R2 1485 might not be R2 but R3. But still, it sounds so different to the real R3 1585 that I tend to believe it's a real R2.

Side-note #2:
Please follow this download link if you would like to download the audio files in .OGG format. Let me know if you would like to listen to the uncompressed .WAV files too.

Side-note #3:
Why .OGG compressed audio files? Because they sound better than .MP3's with the same compression rate and need less disk space. Also, for this test the compression doesn't take much information about frequencies, the difference between SID revisions is still well-audible.


Sunday, December 27, 2015

C64 SID shootout

Page has been updated with a nice music player, shouldn't any playback issue appear anymore \o/

. .. ... .... ....... .... ... .. .

Have you heard about Stone Oakvalley? He is the man behind http://www.6581-8580.com aka. SOASC aka. Stone Oakvalley's Authentic SID collection:

"The SOASC= project is an automated recording technique invented by me (Stone Oakvalley) in order to mass-record music from the legendary Commodore 64 and its original SID sound chips (6581 and 8580), including variations of 6581, such as R2,R3 and R4!"

He gave me the inspiration to make a SID shootout and record 1 (one) music with different SID revisions. I was lucky enough to have my hands on 5 different SID, basically I have one SID from each available revision.

Why did I do it?
Because there is a difference in each SID revision's sound - sometimes it's just a slight difference but it's there - and I was curious how one of my favorite music would sound on each.

Brief SID history, copied from Wikipedia:
  • 6581 R1 - Prototype, only appeared on the CES machines and development prototypes, has a datecode of 4981 to 0882 or so. Has the full 12 bit filter cutoff range. An unknown number were produced, probably between 50 and 100 chips. All are ceramic packages.
  • 6581 R2 - Will say "6581" only on the package. Filter cutoff range was reduced to 11 bits and the MSB bit disconnected/forced permanently on, but is still on the die.The filter is leaky at some ranges and they tend to run hotter than other sid revisions. Made from 1182 until at least 1483. First 10 weeks or so of chips have ceramic packages (these usually appear on engineering prototypes but a few are on sold machines), the rest have plastic packages.
  • 6581 R3 - Will say "6581" only, "6581 R3" or "6581 CBM" on the package. Had a minor change to the protection/buffering of the input pins. No changes were made to the filter section. Made from before 2083 until 1386 or so. The 6581R3 since around the week 47 of 1985 made in the Philliphines use the HMOS HC-30 degree silicon though the manufacturing process remained NMOS.
  • 6581 R4 - Will say "6581 R4" on the package. Silicon grade changed to HMOS-II "HC-30" grade, though the manufacturing process for the chip remained NMOS. Produced from 4985 until at least 2590.
  • 6581 R4 AR - Will say "6581 R4 AR" on the package. Minor adjustment to the silicon grade, no die change from R4. Produced from around 1986 (week 22) until at least the year 1992.
  • 6582 - Will say "6582" on the package. Typically produced around the year 1986 in Hong Kong.
  • 6582 A - Will say "6582A" (or "6582 A") on the package. Typically produced around the years 1989, 1990 and 1992 in the Philippines.
  • 8580 R5 - Will say "8580R5" on the package. Produced from the years 1986 to 1993 in the Philippines, Hong Kong and in the US.

Are you still with me? I hope so because we shall jump into the most interesting part now.

So, based on the WIKI article and the fact that different revisions have different properties, the different SID revisions must sound different. And they do, of course :)

Let the competition begin! The music is "Jeff - Anal'ouge" (HVSC/MUSICIANS/J/Jeff/Anal_ogue.sid), which was composed on a 6581 - as Jeff confirmed he used a C64 with 6581 SID for most of his music.

The computers are Breadbin, Aussie and Blue:


The SIDs are:

01. 6581 R2 - 1485 (Breadbin's original SID)


02. 6581 R3 - 1585 (Aussie's original SID)


03. 6581 R4 - 3387 14 (put into Breadbin)


04. 6581 R4 AR - 4486 14 (put into Breadbin)


05. 8580 R5 - 3991 25 (Blue's original SID)


Conclusion:
This track sounds different on each SID revision :) Even the C64's own noise is different and not equally loud.

My favorite is the 6581 R2, it's rough and dirty and the bass is awesome. However, I like the 8580 R5 as well, it's clean (just listen to the flute-alike instrument at the start) and the bass is softer but somehow this makes the music more ear-friendly to me.

The other revisions sound like they have glitches, the snare-clap is a bit muffled (filtered?), bass is different but not bad at all. The most interesting difference is the already mentioned flute-alike instrument which is kinda distorted/modulated/filtered in a different way on each SID revision.

Which revision is better? Can't tell as it's a question of taste. Pick your favorite.

Saturday, December 19, 2015

Lemon. aka. "Winners don't use AGA"

I've met with the Amiga somewhere around 1993 where one of the guys in the youth hostel showed us some great demoscene productions on his A500. Since that point I had the good ol' C64 and we used 386 PC's at school. The difference between the PC and Amiga was remarkable. The graphics, the audio, the games... everything was just... simply wow.

More than 20 years later I bought an A500. It was just about time.


The machine is a bit yellowed but who cares, I'm gonna retr0bright the sh*t out of it. The fl0ppy disk is broken, it doesn't load anything just gives a "corrupted floppy disk" error message. Whatever, I might gonna invest into a Gotek drive later. I have an Amiga 500! :)

However, the most important part is the 512kbyte memory expansion. These expansions usually as old as the Amiga itself and the mounted battery starts to leak. Badly.


After some research I found that this is normal, as these batteries weren't made for eternity, obviously. If you are lucky then the acid doesn't eat the circuit - and I was lucky.

The leak wasn't _that_ bad, it was just _bad_. Removed the expansion, it was stuck a bit bit I used the force (pun not intended). And desoldered the leaking battery and removed the infected chip as well.


The chip looks like a dead bug but actually it's not dead, just resting. The battery however, is dead.

Side-note: if you have a closer look on the photos you should realize 3 of the 4 similar chips are in a mount but the 4th is not. It's soldered into the panel without a mount. Why?

Anyway, the next step was to clean the panel and the infected areas. What would you use to remove acid?

LEMON! Really. This has something to do with chemistry, pH and acid and alkali stuff, whatever. I don't know about the exact background of it but I gave it a try and used some real lemon juice to clean the panel.

Cut a lemon to half, squeeze the juice out of it into a bowl, stick an earbud into it then pour a lot of lemon drips into the panel, cover all the acid-areas with the juice. You can hear a bit of sizzling noise, this means the lemon fights with the acid. And the lemon will win, you can be sure.

Leave them fight for an hour, then clean the panel with water, let it dry out for some days and voila.


Actually, I was double-lucky this time because the acid didn't melt deeper into the panel and cleaning was simple, there was not necessary to do some electronic soldering work.

Coming up next: cleaning a slightly yellowed A500 and fix the broken floppy drive.


.....


Today's music: Rink A Dink Redux by LEMON. (A500 demo)

Friday, November 27, 2015

The best mouse in the world

This time the post is about a PC mouse. However, it's ~10 years old so we can call it 'oldschool'.
This is the best mouse. Ever. Built. Really.
This one has built for eternity. It still works. It's not even scratched, not broken, the cable is still intact.

This is it:


It's small, light-weight, ergonomic, the cable is NOT 176451264 meters long and it fits my hand perfectly.

Actually, after 10 year the buttons became a bit worn, sometimes I experienced unwanted double clicks and unstable behavior. But other than this THE mouse.

So I was looking for a solution, this means I disassembled the mouse and checked the micro-switch inside. After a quick research I found that they are very standard switches and still available to buy. Guess what, 5 pieces for 1 GBP. And free postage! Wow, that's... a bargain.

It took 4 weeks for 5 pieces of new micro-switches to arrive from China to the UK but it well worth the wait. Maybe they were traveling using donkeys. I don't know, it doesn't matter at all.

So, I disassembled the mouse, this is how it looks like in pieces:


The screwdriver wasn't inside the mouse, obviously, that's just an extra decoration on the photo.

Grabbed the soldering iron and desoldered the micro-switches:


Then soldered the new ones in:


It's getting easier and easier to desolder/solder small items like these switches. There is not much tin around them and desoldering pump sniffs the tin off from the circuit quickly. Also, not much heating is needed on the connectors.

And I have a perfect mouse again!

(disclaimer: this post is NOT an advertisement and NOT sponsored by the manufacturer of the mouse)


.....


Today's music: Mouse on Mars aka. Maus af dem Mars aka. Egér a Marson

Thursday, November 19, 2015

C64 power switch surgery

A few days ago I saved a C64 C. The owner wanted to throw it out because:

"This is just an old keyboard, it doesn't even fit the PC"

 Indeed.

The case has serious scratch marks and looks like soldering iron or something similar melted parts of it. It has replacement screws that are too long and went deeper than they should and drilled new holes into the plastic...

The C64 was surprisingly in a good condition inside. Almost no dust, motherboard was fairly clean, keys are stiff. However, keyboard holder metal parts were missing and the fuse was blown out.

Replacing the fuse was the easiest part, then I gave it a try, plugged the cables in, and switched the C64 on.

Well, I tried to switch it on. The power switch was stucked in the OFF position, I had to use serious force to switch it ON.

And... after a few breathless seconds and the init black screen...

It's alive!

Everything works fine, except the stiff power switch. I have to do something with it. Why not replacing it to a new one? Yeah, that's a brilliant idea.

The hunt for a new switch was easy, I should consider myself lucky as there was an ad on AmiBay, a guy sold some spare switches for a few bucks. Let's do some serious soldering business again!


Look at those tiny legs, they are easy to heat up and sniff the tin off with a desoldering pump. But the 2 stronger stuff that are not really visible because I was lame and didn't make a better photo... I recommend to use a better soldering iron with 75-80W power at least, it can heat up the tin much faster.

These are connected to the "ground" and are deeper mounted into the motherboard with more tin.

I was afraid I would heat the panel up too much, so I used brute force - and a screwdriver - to remove the switch: heat it up as much as possible AND insert a screwdriver under the switch at the same time.

It worked well and did not cause any damage on the motherboard.

So, next step was to insert the new switch and burn it in. I've chose a very thin tin (hehe, thin tin, hehe...) and a small amount was enough to glue the switch into its place.


It was easy. Really. Even an amateur like me can do it without risking to break anything.


It's not the most beautifully soldered switch ever, but good enough. Those brown burn-a-like spots were already there, I suppose this C64 got some serious electric shock, maybe from a damaged power supply and that burned the panel a bit. This would explain the broken fuse as well.

Now I need to find a solution to the plastic case...


Conclusion:
  • Heat, heat, heat! Need a lot of heat.
  • Use the force IF heat doesn't help.
  • Be careful but be strong with the heated up part.


.....


Friday, November 13, 2015

Super Nintendo - From Yellow to Reborn

Sooooo, it took around 2 weeks to clean a SNES and it could have been shorter if we had sunny days... instead of natural UV light I had to use a UV light bulb which is not that efficient. Other than this the procedure was kinda the same as with the C64. Basically this is the short version of the SNES Story.

Longer version:
I was happy when I received the special screwdrivers and finally was able to dismount the SNES.
Everything started with a dirty-dusty, yellowed machine:


As I already mentioned in a previous post, it was fairly easy to clean the cartridge slot with earbuds and compressed air, so the SNES was in a good working condition but the plastic was, well, just look at the photo...

Disassembly is easy if you have the right tools:


However, I still don't understand why it was necessary to use 2 different type of screws (check previous post).

Surprisingly, the interior wasn't that dusty as I expected. A slight push of the compressed air bottle and a soft brush touch did the job well.


And then... no sunshine for days... what a sad week was that. I mounted the UV light to the slot, moved my bed from the bedroom to the kitchen and put the cardboard box into the bedroom.

For a few days only.
Then a bit more...

Cardboard box and aluminium foil interior, it helps to reflect the UV light to EVERYWHERE.


Switch on the UV light:


And we wait.

Still wait.

Even more...

After 6-7 days I was fed up with this procedure and cleaned the plastic parts from the cream, using a lot of warm temperature water in the bathtub.
Result:


After reassembly:


And... what is that..? Oh, no, again...


A leftover screw...
I have no idea where it belongs. Really. There were no empty slots, no holes, nothing. All I can think of this screw belongs to another device. Hopefully.

But at least the SNES works fine, I played with many games since I cleaned it.

Conclusion:
  • SNES disassembling is easy
  • UV light bulb s*cks. Should use natural UV light or a lot more powerful bulb.
  • Clean the plastic after 2 days and re-apply the cream again to achieve more even whitening
  • SNES parts are a bit harder to reassemble, it has more parts and it's a bit more complicated inside than a C64
  •  SNES is fun. SNES is a robust machine.
  • Aluminium foil is great, it reflects the UV light and spreads it everywhere.


.....


Today's slightly annoying music: Pac-Man DX soundtrack


Monday, November 9, 2015

Retro Computer Museum - Leicester, UK

I had the chance to visit Retro Computer Museum in Leicester last weekend. That place is the heaven for retro computer enthusiasts. They have a lot of curiosity of various stuff and you can have your hands on anything and play. It definitely worth to visit and spend hours with chatting with people, playing games and having fun.